Monday, 26 October 2015

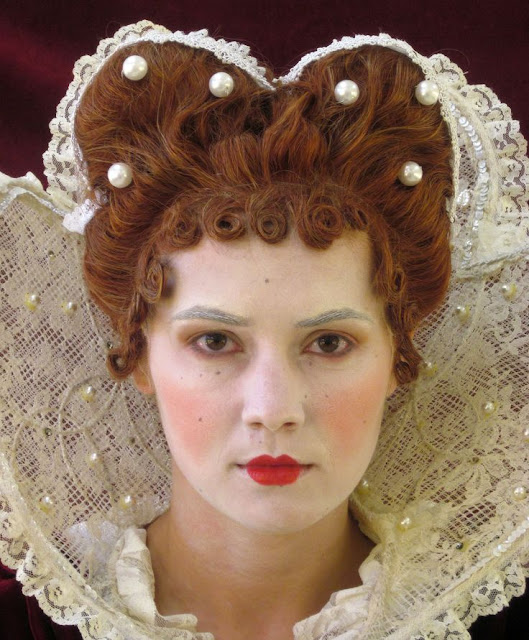
Modern Elizabethan hairstyle - Week 5

For this design, again, I didn't draw the hairchart before. I was confident enough that for the modern hair task I will be inspired on the moment. But I've been so wrong, because I feel like I actually was so uninspired. In the end, I kinda liked the overall result, but I can't say that I was completely satisfied about it because I think that it somehow lost it's Elizabethan feel. I think that it turned up to be more like Geisha style rather than Elizabethan which is not what I desired. But as Sharon said at the beginning of this semester: "failure is a part of success". I wouldn't say that is a failure, but it's not what I really wanted and that's because I didn't design a haichart before so I can actually know exactly what I want to do. Now I really understand the importance of planning the designs and doing the haircharts. At least I've learned from my mistakes and in the future I'll know exactly what and why I have to plan ahead properly, rather than relying on the moment's inspiration. 
I have to start managing my time and priorities better, and to stop complaining in my head that I am unefficient sometimes just because I moved into another country. It is hard indeed, all these changes, from the school system to the way people are thinking (talking, eating, working, doing whatever), being away from my family and friends, sometimes get me so confused. But I have to be strong and face those so I can become better.
If I were to do this hairstyle again, I think I would add more texture and more volume to the hair. Maybe some crimping in the front and some curls at the back... but certainly I'd draw haircharts for it so I can be fully prepared.


Steps for creating this look:
  1. Section the hair in 4 pieces. Leave the back pieces unpinned;
  2. Add padding in two of the sections: the second and the third (you can know which is which if you count from the front to back). To make the hair rats more stable and to add volume, backcomb the hair and then roll it on the hair rat. Try to achieve a nice, round shape;
  3. Style the front piece of hair in some sort of visor, just so the hair doesn't cover the forehead;
  4. Section again the last piece of hair, the fourth one, in 4 sections. French plait the two sections in the middle and then roll the ones on the sides between the padded sections, so you can finish the look;
  5. Pin everything that was not pinned before and add hairspray to set the hairstyle.


Thank you, lovely Lia, for being my gorgeous model. 


After the session I've drawn the design, just in case I'll need it in the future:

Monday, 19 October 2015

Historical Elizabethan hairstyle - Week 4

Today was a big day for me because it was the first time when I got to work on a real person's hair rather than on Kate head. My model was Fatima, who was brave enough to let me do her hair, even if I have warned her that it's my first time. Our theme was recreating an Elizabethan hairstyle using the techniques we have learnt last week (padding, frizzing, curling, backcombing etc).

 I wasn't so conscientious and I didn't do my design at home (I wanted to be but I had so much work to do this weekend) but I have improvised something considering Fatima's beautiful, long hair and that's what happened:


I am pretty pleased by my last-minute design, except the fact that I should have covered the holes I have created in her hair with something. I actually wanted to do so but I haven't got any idea of how could I do this so I just left it like that. 
Working on person felt quite uncomfortable at the beginning, but as I got used to it, it felt way better than I expected. I was surprised that, even if I'm a slow person, I have finished everything in just about 1 hour... maybe that's because I was really inspired by the pictures and portraits I have researched so far.
Our tutor, Helen, told me that she hasn't seen so many Elizabethan portraits where the sitter had plaits on the edges and this looks more modern than classic and that the hair color of the model helps me to achieve this look, but that's also fine and I shouldn't worry.
I think that next time I'll try to change a bit my design or draw it at home so I'll avoid any mistakes that can appear because I didn't think properly about the construction of the look.
Overall, everything went good today, even if I couldn't attend Sharon's seminar. In the morning I was feeling really bad because I have worked all the weekend and I couldn't get out of bed... I was upsed that I didn't attend even if I wanted to, but I will ask my colleagues and I hope I will catch up.

When I got home after the session I drew the historical design, so my work could be complete.


Monday, 12 October 2015

Padding and backcombing - Week 3

At today's technical lesson we were taught by Lottie how to pad the hair, how to make and insert hair rats, how to crimp using the hair crimper and how to backcomb the hair correctly. Also, we were familiarized with securing correctly the padded hair/the hair rat into a french plait using bobby pins. These techniques are ideal for creating the Elizabethan hairstyles or the modern inspired ones, but also to add volume to any hairstyle we want to create.
Photos of my work from the studio:

1. Crimping;

2. Setioning and backcombing the hair:


3. Creating a heart-shaped look using only backcombing to give volume or padding (hair rats). The bigger part was made just by backcombing, but it wasn't that stable as the smaller one in which I added a hair rat and I've french plaited the hair to set the hair rat in it.


Frizzing/rick-racking - Week 3

Today at we looked at images with Elizabethan and modern hairstyles and we discussed about them, about the technique that the hairstylists used to do the models hair that way, about what products and tools did they use and what we can use to achieve that look too. Helen showed us how to frizz and crimp the hair with a straightener and some hair pins and then we had to do the same on our Kate heads. This technique is called rick-racking and requires a lot of time and patience.
Here are just two photos of my finished look (Kate had her head tight back) because I forgot to take photos with the hair still in the pins:


Fortunately, I've found a whole story about the process of rick-racking and I thought that it could be useful to add some of the photos here, especially because I didn't take photos of my own process.


Thursday, 8 October 2015

Research - How Elizabethans used to adorn their hair - Week 2

Elizabethan women used to adorn their hair to show that they are distinct from others and to show their status. They were inspired by the Queen and liked to add pearls, precious stones, feathers, hats, veils, coifs or cauls, or a crown, in the Queen's case. Here are some examples of both historical and modern portraits and photos which show how women incorporated adornments into their hairstyles. 

"Elizabethan London showed a strange resemblance to renaissance Venice in regard to feminine fashions. In both places it was the custom to expose the breasts freely, to paint the face and to dye the hair, "almost changing the accidents into the substance". Apparently, too, the stylish women of England followed their Italian sisters in the quest for the blond, and were not above inveigling children with golden locks to part with them for a penny. On the edge of their "bolstered" hair they hung "bugles", "ouches", "rings", and other ornaments of silver and gold; and across their foreheads were laid, from temple to temple, a gilded or silvered fillet."


Historical images: drawings and portraits


Queen Elizabeth I (1533–1603), English School, circa 1592. A half-length portrait of the Queen wearing a richly embroidered and jewelled dress with elaborate lace ruff and collar. She has a 'moon-jewel' in her hair. The painting is possibly derived from Isaac Oliver's miniature of the ageing Queen.


1606 - Painting by Robert Peake the Elder (British, active by 1576, died 1619)
 of Princess Elizabeth (1596–1662), Later Queen of Bohemia


Amazing Elizabethan hood on Etsy by CadwaladrCostumes


Queen Elizabeth I (Cate Blanchett) 'Elizabeth: The Golden Age' 2007. 
Costume designed by Alexandra Byrne.

Purchased by Queen Mary c. 1860-70, Gold, Colombian emerald, enamel, diamonds, woven material, possibly hair, behind the emerald. 
The centre stone may have once been owned by Queen Elizabeth I. 9 x 3.7 cm


Ann Boleyn , 1505-36. 
Drawing by Holbein the Younger.


Young woman with plucked eyebrows and shaved hairline.
 Drawing by Urs Graf, 1518.

Claudia of Beaune. School of Clouet, 1568.

 The eyebrows are plucked and the hairline is shaved.


"The Elizabethan fashion dictated that the head was adorned with a hat, veil, coif or caul. This fashion therefore ensured that much of the hair was hidden by some form of head coverings. The style of the head covering dictated the hairstyle. Many of the hats were adorned with feathers, pearls, glass jewels, spangles, gold thread, embroidery and lace.

  • The Coif - The coif ( commonly referred to as the 'biggin' ) worn by all children. Material was plain white linen, a close fitting cap tied under the chin. Coifs were often worn as caps to keep hair in place under more elaborate hats;
  • The French hood - Introduced from the French court by Anne Boleyn, the mother of Queen Elizabeth I. A half moon, or crescent, style band or brim sloping away from the face. The edges were often adorned with pearls or glass jewels, called bilaments, and a veil covered the back of the hair;
  • The Atifet - Similar to the French hood style but with a heart shaped crescent - favoured in white by Mary Queen of Scots. Lace trimmnigs were added;
  • The Caul - Cauls were the Elizabethan hair net. A Caul covered the hair at the back of the head and was made of fabric, or fabric covered by netted cord which was sometimes adorned with spangles;
  • The Pillbox style of hat - often had a veil attached to the back."


Modern, Elizabethan inspired images:


Virginia Kiss in “Misty Dream” by Joanna Kustra for Factice Magazine


Hellizabeth || Modern interpretation of 16th century fashion.

Givenchy haute couture f/w 1998

Chanel pre-Fall 2013

Liza Espinoza. NAHA


#NAHA2015 Master Hairstylist of the Year Finalist, Dusty Simington

Queen Elizabeth I - Caity by Katriena Emmanuel; costume and styling by Shieltz Calamba


December 2013 Vogue


Regal Impression by Errol Douglas

Avantgarde - Hair: Jose Siero Leal @ Sile Peluqueros Photo: Javier Galue via Lorriet | cynthia reccord


 @ Alexander McQueen Fall 2015


Chunky Medieval Fashion - Harper's Bazaar Vietnam 'Nu Renaissance Aristocracy' is Fit for Royalty (GALLERY)


Frida Gustavsson backstage at Alexander McQueen Fall 2013


Balenciaga Paris Spring 2006

Louis Loizides Mitsu - Marianna Neophytou @ Modelpro - makeup Anastasia Stacie


Lorena Agnelli, photographer unknown. Corset and skirt: Vivienne Westwood Gold Label / Crown: Slim Barrett / Jewellery: Marni, Louis Vuitton, Temperley London, Pebble London, Links of London

Karen Elson as Elizabeth I - Face Forward by Kevyn Aucoin, 2000


Sources:

  1. Black, J. B. (1994) The reign of Elizabeth, 1558-1603. 2nd edn. New York: Oxford University Press.
  2. Corson, R. (2001) Fashions in hair: The First Five Thousand years. 2nd edn. London: Peter Owen Publishers.
  3. Elizabethan hair styles (no date) Available at: http://www.elizabethan-era.org.uk/elizabethan-hair-styles.htm .
  4. Elizabethan make-up and hairstryle insp (2015) Available at: https://ro.pinterest.com/isimonagabriela/elizabethan-make-up-and-hairstryle-insp/ .